Why Preact?
Preact is a lightweight altrenative to React that focuses on perfomance. It houses an extensive compatibility layer with React to make sure your existing React code can be used in Preact. It's called preact/compat according to Preact's website it's bundle size is 3kB which is pretty low compared to the minified bundle of react + react-dom size of 128kB. If you care about squeezing out every last bit of perfomance for your project then Preact's the way to go, they prioritize perfomance and is one of the key feature's of Preact also Preact has no dependency.
Ease of Use
Replacing React with Preact in your project is pretty easy we are going to leverage Webpack's alias to do it.
The process is pretty simple. First, we install preact and preact/compat with those dependencie's installed, we will configure webpack to alias React imports so they point to Preact instead.
Installation
Let's start with installing our Preact dependencie's
# If you're using npm
npm install preact

# If you're using yarn
yarn add preact
now that we have our dependencies installed let's configure our next.config.js file to set alias for React, we are going to use Preact only on the Production Build.
module.exports = {
  reactStrictMode: true,
  images: {
    domains: [],
  },
  webpack: (config, { dev, isServer }) => {
    // Replace React with Preact in production build
    if (!dev && !isServer) {
      Object.assign(config.resolve.alias, {
        react: "preact/compat",
        "react-dom/test-utils": "preact/test-utils",
        "react-dom": "preact/compat",
      });
    }
    return config;
  },
};
Now that our next.config.js file is properly configured let's just build our project to see the result's.
#If you're using yarn
yarn build

#If you're using npm
npm run build
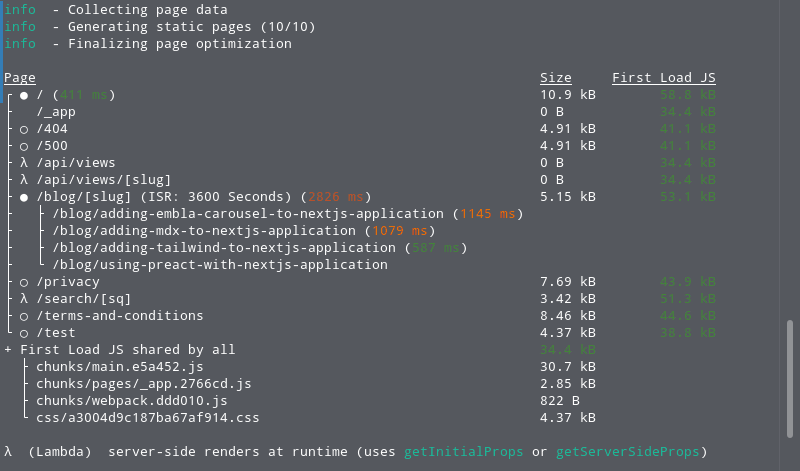
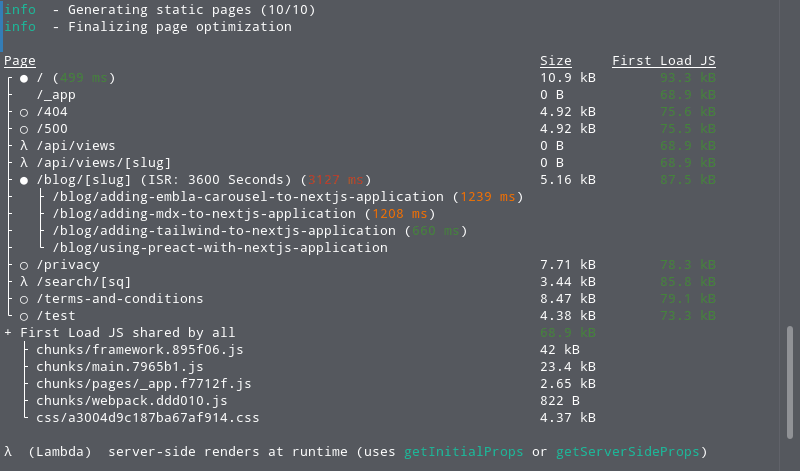
Here's the build output for LEARNNEXT's build output with and without Preact.

build output with Preact

build output without Preact
Notice the considerable difference in First Load JS size, this won't be perceivable in modern network connection's and devices but will considerably decrease the first load time for users that might be using 3G networks and congested network connections which inturn improve your applications user experience.
This was a detailed walkthrough of using Preact in your NextJS application instead of React, If you would like to know more about Preact and it's advantage's over React, I highly recommend reading their Getting Started Page.
